Considering a bump out addition for your home? This comprehensive guide will walk you through everything you need to know about bump out additions, from planning to completion. You’ll discover the transformative power of these small expansions, seeing dramatic before and after examples that showcase how bump outs can maximize your living space. We’ll explore key considerations, design options, costs, and construction processes to help you make informed decisions. Whether you’re looking to add a cozy reading nook or expand your kitchen, this article will equip you with expert insights to successfully tackle your bump out project and create the home of your dreams.
What is a Bump Out Addition?
A bump out addition is a small-scale home expansion project that extends a room’s footprint beyond the existing exterior wall. This type of renovation allows you to gain additional square footage without the complexity and cost of a full-scale addition. Bump outs typically range from 2 to 15 feet in depth and can be applied to various rooms in your home.
How is a Bump-Out Addition Different from a Regular Home Addition?
Both regular and bump-out additions aim to expand your home’s usable space. However, bump-out additions are more cost-effective than full-size additions due to their smaller size and reduced material requirements. Additionally, bump-out additions can be cantilevered off the side of your home or existing foundation, eliminating the need for extra foundation work, unlike regular home additions.
Common Uses for Bump Outs
You might consider a bump out addition for various purposes:
- Expanding a kitchen to accommodate a larger island or dining nook
- Creating a cozy reading nook in a living room or bedroom
- Adding a walk-in closet to a master suite
- Enlarging a bathroom to fit a luxurious soaking tub
- Creating a home office space in an existing room
Benefits of Choosing a Bump Out
Opting for a bump out addition offers several advantages:
- Cost-effectiveness: Bump outs are generally less expensive than full-scale additions due to their smaller size and simpler construction.
- Minimal disruption: The construction process is typically faster and less intrusive than larger renovation projects.
- Increased property value: Even small increases in square footage can significantly boost your home’s market value.
- Improved functionality: Bump outs allow you to address specific space needs without overhauling your entire floor plan.
Considerations Before Starting
Before embarking on a bump out project, you should consider factors such as local zoning laws, structural requirements, and potential impacts on your home’s exterior aesthetics. Consulting with a professional architect or contractor can help you determine the feasibility and optimal design for your bump out addition.
By understanding what a bump out addition entails, you can make an informed decision about whether this type of renovation aligns with your home improvement goals and budget constraints.
Planning Your Bump Out Project
Assessing Your Needs and Space
Before embarking on your bump out addition project, carefully evaluate your current living space and identify specific areas that require expansion. Consider how the additional square footage will enhance your daily life and improve your home’s functionality. Take precise measurements of the proposed bump out area, ensuring it aligns with local zoning regulations and property setbacks. Consult with an architect or designer to create preliminary sketches that visualize your vision and help you refine your ideas.
Obtaining Necessary Permits
Navigate the permit process by researching your local building codes and zoning laws. Contact your municipality’s building department to determine the specific permits required for your bump out addition. Typically, you’ll need a building permit, and depending on the scope of work, you may also require electrical, plumbing, or HVAC permits. Prepare detailed plans and documentation to submit with your permit application, including architectural drawings, site plans, and structural calculations.
Budgeting and Cost Estimation
Develop a comprehensive budget for your bump out project, accounting for materials, labor, permits, and potential unforeseen expenses. Request detailed quotes from multiple contractors to get an accurate cost estimate. Factor in the following elements:
- Foundation work
- Framing and structural support
- Roofing and siding
- Windows and doors
- Electrical and plumbing
- Insulation and drywall
- Flooring and finishes
Consider allocating an additional 10-20% of your total budget for contingencies to address unexpected issues that may arise during construction.
Selecting a Qualified Contractor
Choose a reputable contractor with experience in bump out additions. Research potential candidates by:
- Checking online reviews and ratings
- Requesting references from past clients
- Verifying licenses and insurance coverage
- Reviewing their portfolio of completed projects
Interview multiple contractors, discussing your project vision, timeline, and budget constraints. Ensure they provide detailed written proposals and contracts outlining the scope of work, materials to be used, and payment schedules.
Establishing a Realistic Timeline
Work with your chosen contractor to develop a realistic project timeline. Consider factors such as permit approval processes, material lead times, and potential weather-related delays. A typical bump out addition can take anywhere from 4 to 12 weeks, depending on the project’s complexity and size. Create a detailed schedule that outlines key milestones and completion dates for each phase of construction, allowing for some flexibility to accommodate unforeseen circumstances.
Bump Out Addition Before Photos

Before embarking on your bump out addition project, it’s crucial to document the existing state of your home’s exterior. These “before” photos serve multiple purposes and will prove invaluable throughout the renovation process.
Capturing the Original Structure
When taking before photos of your home’s exterior, aim to capture comprehensive views that showcase the area where the bump out will be added. Start by taking wide-angle shots from various angles to provide context for the proposed changes. These images should clearly depict the current architectural style, materials, and overall aesthetic of your home.
Pay particular attention to the specific wall or section where the bump out will be constructed. Take close-up photos of this area, focusing on details such as windows, siding, trim, and any unique architectural features. These shots will serve as reference points for contractors and help ensure seamless integration of the new addition.
Documenting Potential Challenges
As you photograph the exterior, make note of any potential obstacles or challenges that may affect the bump out construction. This could include:
- Proximity to property lines
- Existing landscaping features
- Utility connections or meters
- Drainage systems or gutters
- Foundation details
Capturing these elements in your before photos will help your design team and contractors anticipate and address any issues early in the planning process.
Creating a Visual Record
Your before photos will serve as a valuable historical record of your home’s original appearance. Consider taking photos at different times of day to capture how light interacts with the existing structure. This can be especially helpful when planning window placement or considering how the bump out might affect natural light inside your home.
Additionally, these images can be used to create before-and-after comparisons once the project is complete. Such visual transformations are not only satisfying for homeowners but can also be useful if you decide to sell your home in the future, demonstrating the value added by the bump out addition.
By thoroughly documenting your home’s exterior before beginning your bump out project, you’ll be well-prepared for the transformation ahead. These photos will guide your design choices, assist your construction team, and provide a lasting memory of your home’s journey.
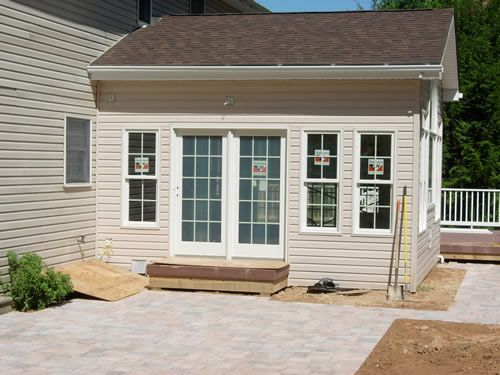
Bump Out Addition After Photos

After completing your bump out addition, you’ll want to capture and showcase the stunning transformation. These “after” photos not only serve as a testament to your home improvement journey but also provide inspiration for others considering similar projects.
Capturing the Exterior Transformation
When photographing the exterior of your newly completed bump out addition, aim to showcase the seamless integration with your existing home. Position yourself at various angles to highlight how the addition complements the original structure. Capture wide-angle shots that demonstrate the expanded footprint and any architectural details that enhance your home’s curb appeal. Pay special attention to new windows, siding, or roofline features that may have been added during the project.
Highlighting Interior Improvements
Interior “after” photos should focus on the newly created living space and how it enhances your home’s functionality. Use natural light whenever possible to showcase the brightness and openness of the area. Consider taking photos at different times of day to capture how the light changes and affects the space. Highlight any custom features, built-ins, or unique design elements that make your bump out addition stand out.
Before and After Comparisons
Create compelling side-by-side comparisons of your home before and after the bump out addition. These visual contrasts effectively demonstrate the project’s impact and value. Ensure you take “after” photos from the same angles as your “before” shots to provide an accurate representation of the changes. This approach allows viewers to appreciate the full extent of the transformation and envision similar possibilities for their own homes.
Showcasing New Room Functionality
Your “after” photos should illustrate how the bump out addition has improved your home’s livability. If the project added a new bedroom, capture images that show off closet space, window placement, and overall room dimensions. For kitchen or living room expansions, photograph how the additional square footage accommodates new furniture arrangements or appliance placements. These functional shots help potential homeowners understand the practical benefits of a bump out addition.
By carefully documenting your bump out addition with high-quality “after” photos, you create a visual narrative that celebrates your home’s transformation and inspires others to embark on their own renovation journeys.
Conclusion
In conclusion, a bump out addition can dramatically transform your home, providing valuable extra space and enhancing its overall functionality. At Livermore ADU Builder & Room Addition, we specialize in room addition services, including bump out additions, and can guide you through every step of your project, from the initial “before” stage to the stunning “after” results.
By carefully considering the before and after aspects of your bump out addition, we ensure a successful project that meets your needs and adds value to your property. Our experienced team meticulously plans each project, adheres to local building codes, and seamlessly integrates the new space with your existing structure. Whether you’re expanding a kitchen, adding a sunroom, or creating a cozy reading nook, our well-designed bump outs significantly improve your quality of life and home’s appeal.
With Livermore ADU Builder & Room Addition, you can trust that your bump out addition will be executed to the highest standards, creating a harmonious and practical living space. We’re here to help you transform your vision into reality, enhancing both the functionality and value of your home. Contact us today to discuss your bump out addition project and experience the difference our expertise can make in your before and after journey.
FAQs
How big can a bump out addition be?
A bump out addition can vary in size, typically extending the floor space by 2 to 3 feet, but it can go up to 10 to 15 feet depending on the structural capacity of the existing home and local building codes. Larger bump outs may require additional support, such as posts or cantilevers.
What is an example of a bump out addition?
An example of a bump out addition is extending a kitchen to create more space for a dining area or a larger cooking area. This can be achieved by pushing out the exterior wall a few feet to add significant usable space without requiring a full room addition.
Do you need a foundation for a bump out addition?
Yes, a bump out addition typically requires a foundation. Depending on the size and design, this can be a full foundation, a crawl space, or a cantilevered structure supported by beams and posts.
What is a bump out on a house called?
A bump out on a house is often referred to as a “micro addition” or “mini addition.” These terms highlight the small-scale nature of the extension compared to a full room addition.